Two Ways to Make Umeboshi, the Pickled Plum You’ll Want to Add to Everything
There are two reasons to make umeboshi, sour pickled plums that darken the longer you store them. The plums themselves are there, but you’ll also be rewarded with umesha, a plum-flavoured salty violet liqueur that you get as a by-product of the process. I appreciate them equally, and I’m going to explain two ways to prepare these treats: the traditional way to use in late spring and the unconventional way you can use in late summer/early fall.
I’ve been making umeboshi for years (the wrong way), so I went to Jane Hashimawari of Ippai in Portland, Oregon, whom I’ve been following online and occasionally forcing extra veggies to learn how to properly prepare these irresistible sour treats. Jane’s cooking at the start of the pandemic on Instagram , which was heavily spiced up with her natural sense of humor, got me through the first few months of lockdown, inspiring me to cook Japanese dishes I’d never thought of before. Her main portfolio is Japanese takeaway and catering with a focus on seasonal Northwestern ingredients. Since I know that she is doing umeboshi legally, I asked about her process.
How did you learn to make umeboshi?
In fact, I did a lot of research by reading old Japanese cookbooks, watching old YouTube videos of grandmothers, and asking my mom questions. She never made umeboshi when she was growing up, but her mother did, so she had some memories. It seems redundant to me to dig so deep, but, you know, there is always more than one way to do something!
You write a lot about your mother, her Japanese vegetable and fruit garden, and your memories with her. How important are umeboshi to you?
I have such a deep connection between food, memory and culture with umeboshi that I felt I should respect the cooking process myself if I had the means to do so. It was in our daily meals, whether onigiri accompanying a plate of marinade or a condiment to a dish.
What is your favorite thing to do with umeboshi?
I actually love to eat ume in varying degrees of softness. When it’s still firm, we call it “kari kari ume” and [it has] a nice crunchy texture but still a nice “umeboshi” flavor. I love eating it with rice. I also like to make umeboshi mayonnaise (coarsely chop umebo and mix with mayonnaise) and eat it on a piece of fried fish! But in general, umeboshi are just great inside an onigiri wrapped in nori.
Jane Hashimwari’s umeboshi process
Ingredients:
- 3 pounds ume plums (usually found in early May at Asian grocers, call and ask).
- ½ pound non-iodized salt
- 4 cups fresh red shiso leaves
- ½ glass of vodka
This process takes several months, so you should appreciate your patience. Jane soaks the plums in fresh water overnight, then uses a toothpick to pry the stem off the plums. It was very easy to do and it only took a few minutes to go through them all.
The vessel in which you make umeboshi must be absolutely clean. Wash and dry it, swirl the vodka inside, then pour it out. This disinfects the jar. Start stacking the plums in layers in the pitcher. Do it in an orderly manner; don’t just drop them. Try to create layers, and between each layer you will sprinkle some of this salt. By the time you’re done, you’ll need all the salt in the jar, so measure it out as you go.
When you get to the top, you will have to press down the plums, and there are many ways to do this. Obviously you can buy pickle weights, but you can also put a brick or heavy can in a Ziploc bag and use that. Either way, you need to be sure to completely cover the top, no matter what you use to press down on the plums.
Now you are waiting. Ume plums are available in early May, but the red shiso you need for the next part doesn’t grow until the end of June, so until then you can watch the salt in the jar draw the liquid out of the plums, creating a liquor that coats them. Don’t open the pot.
Get a beautiful pot for pickled plums:
- 3 liter TOMO fermentation pitcher with weights
- 5 liter ceramic pot with weights
- 1 gallon ceramic pot with weights
In June, when red shiso is ready to be harvested, take the leaves inside, massage them with plenty of salt, and leave overnight in a bowl, covered with a clean kitchen towel if you’re worried about dust. “This removes impurities,” Jane explains.
The next day, place the contents of the jug in a clean bowl that you have also sanitized with vodka. Now put everything back into the pot, this time with shiso leaves. Add shiso leaves, then a layer of ume plums, then more shiso and so on until you reach the top and all of the shiso is between the plums. Now weigh it again. In the coming days, the liquor will turn shiso red and take on a gorgeous shade of purple. Shiso also adds flavor.
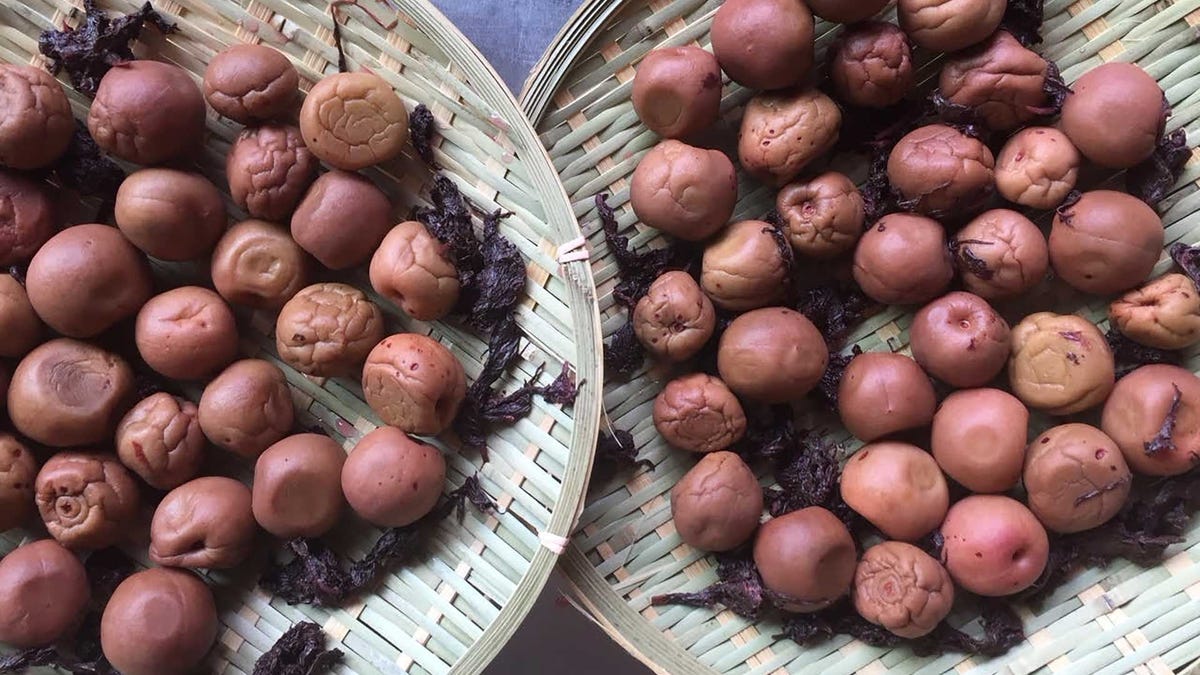
The last step when it’s really hot outside is to dry the shiso and plums in the sun. You do this every day on a drying mat, returning them to the pitcher in the evening. Do this for two to four days and the plums will have the desired texture, which is slightly chewy and slightly dry, but still moist on the inside. Hashimawari called it “soft, but not like a raisin!
Then you just turn them over and let them age, the longer the better.
How to make unconventional umeboshi
I live in the Pacific Northwest, so there are a lot of fruit trees around me. Over the years, my neighbors gave us a giant Italian plum that was always shedding its fruit. During the summer, I picked green plums to make my own version of umeboshi, knowing that it was not the same as the real one. It’s no surprise that it still makes really phenomenal pickles and lots of umeshu, which I love. I don’t know if Jane’s family would approve, but if you can’t get your hands on real ume plums, you can try this.
Ingredients:
- 3 pounds green Italian plums. They shouldn’t have red or purple on them, but a slight blush is fine.
- ½ pound non-iodized salt
- 4 cups fresh red shiso leaves
- ½ glass of vodka
Clean the plums as described above and make sure they are free of petioles and stains. Wash your jug in the same way, then dip the plums in the same vodka. Since these plums and shiso are ready at the same time, we will put them all together. Add a layer of shiso, then plums, then salt, and start over. Lay them to the brim, place a load on top and leave for a few weeks until the plums are covered with umesha.
You can continue the drying process above, then place them back in the jar and let them mature. I found that second-year umeboshi made in this way are simply out of this world, but the umebu can be used right away.
How to use umeboshi and umesh
My favorite life hack is to add umesha to whipped cream . It is salty and colorful and makes whipped cream taste special. Laid out in layers on a biscuit matcha cake, it is luxurious in a new and unique way. I also love umeboshi sliced on top of soba or ramen noodles, or just some furikake rice. Hashimawari makes umeboshi onigiri every year, which are very popular.
The good thing about umeboshi is that you really have to be patient and just let the process happen. After a few years, it goes awry and forms mold, and you have to throw it all away. Other years are better for reasons I cannot determine. After all, you’re taking part in a beautiful Japanese tradition that honors plums and shiso, and you’ll usually end up with one tasty pickle.