Make This DIY Swamp Cooler
If you find yourself facing an unexpected wave of heat and your air conditioner has turned off, staying cool can be difficult. While nothing beats the cool airflow provided by a traditional AC unit, there is a DIY approach that can help. Building your own emergency bog cooler is an easy project that only requires a few tools and materials.
What is a swamp cooler and how does it work?
A swamp cooler, also known as an evaporative cooler, draws air into the container and over the water or ice, causing an energy exchange in which heat from the air is absorbed by the surface of the ice or water, cooling the surrounding air. This process is known as “evaporative cooling” and works in the same way as sweating. You can purchase a swamp cooler or make your own relatively inexpensively. A DIY setup uses a cheap commercial fan to blow air over ice or water to achieve an evaporative cooling result.
While a homemade swamp cooler works to cool the ambient air 15-40 degrees Fahrenheit, it’s not as efficient as an air conditioner and will work better in a smaller space. Since you are using a fan to power the system, the swamp cooler can only cool the air as fast as the fan can move it. Instead of trying to use it to cool the whole house, pick one room that you can cool and you’ll get the best result. Swamp coolers also need to be cleaned frequently to prevent mold from forming. While a homemade swamp cooler probably won’t last long anyway, you should clean the inside of it every couple of days to prevent mold and bacteria from building up.
Also important to note: Swamp coolers will not provide relief in damp rooms , as they add moisture to the room.
container method
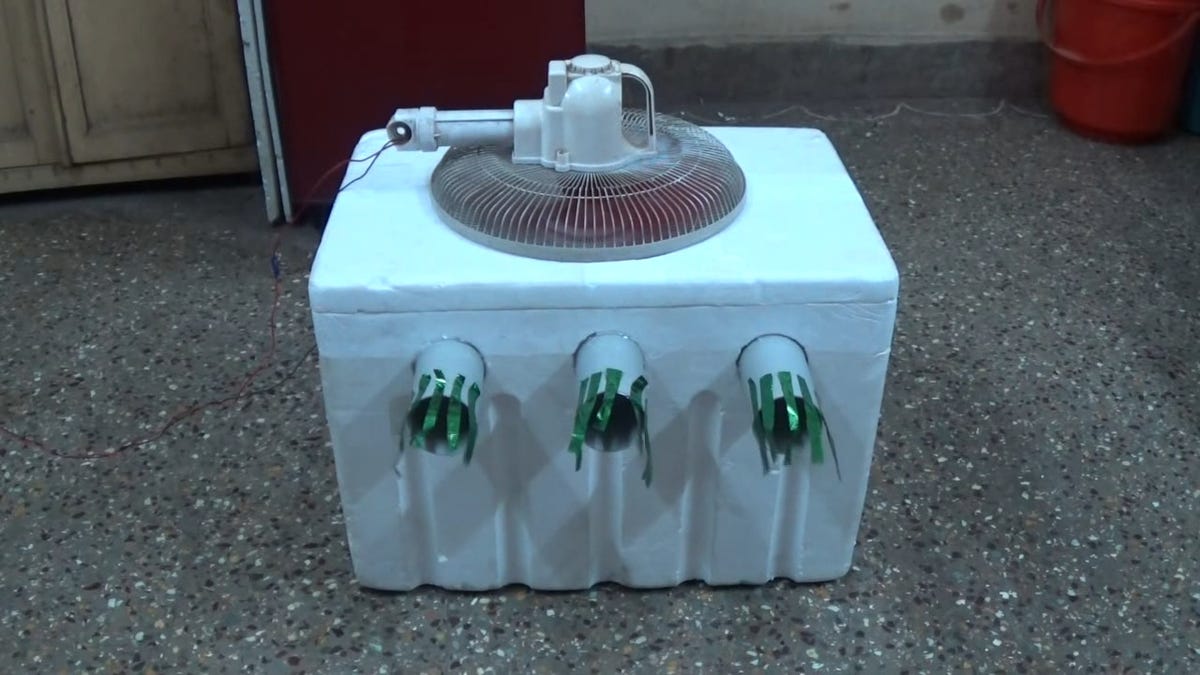
The best container for a homemade evaporative cooler would be an insulated one, although a five gallon bucket has been successful for some people. In general , a foam cooler is the simplest ice container because it is insulated but easy to cut.
It is important to have about five gallons of capacity for your container and lid. In addition to ice and a cooler , a small fan that can be attached to the lid of the container, and two PVC elbows about two inches in diameter.
To build your swamp cooler, cut a hole in the top of the cooler slightly smaller than your fan. If your fan has a square case, you can cut a hole the size of a spinning blade and place the edges of the fan on top of the cooler. It is recommended to glue the fan in place, but you can also use tape if you have it. Then cut one hole for each PCV elbow about four inches from the bottom of the container. Glue or press your elbows into place and then place ice on the bottom of the refrigerator and close the lid. Your swamp cooler should be ready to use.
While some people swear they use frozen water bottles instead of loose ice in your fridge, it will work better if there’s water in there as well, since evaporation is how the air cools. Using frozen water bottles to cool the water instead of ice will make it easier to change them, but you will always need a reservoir of water for this.
Box fan method
There is also a construction method using a box fan .
This design is a bit more complex, but it moves more air. For this method, you will need a bucket , water pump, window screen , flexible tube , and a special evaporative cloth .
To make this version, cut the screen and cloth the same size as the box fan. Place the screen on the back of the fan, and then lay the cloth on top. Attach the screen and fabric to the fan with zip ties or wire . Attach the tube to the edge of the fan with zip ties or wire, leaving a foot or two of tube in one corner to draw water from the bucket. Make many holes in the surface of the tube around the edge of the fan, as you would in a garden soak hose. Fill the bucket with water and connect the tubing to the pump by placing the pump in the bucket and clamp the end of the tubing not connected to the pump closed to force the water out through the holes in the tubing. Press the switch to turn it on and make sure it is placed on a waterproof surface, or add some sort of drip tray to collect any excess water that may form at the base of the fan.