You Can Build a Hidden Cabinet Into the Wall
Using the inside of walls as storage space is often touted as a feature of tiny house living, which can be a good solution for any size home. Whether you need a low profile first aid kit or some inconspicuous kitchen pantry, a hidden cabinet is a project that any DIY enthusiast can tackle.
Before diving in, this is an interior wall project in a timber frame house with drywall or lath and plaster. This is not suitable for steel framing or concrete walls because your ability to cut enough space and attach pieces to the inside of the wall is limited, and some types of fasteners can damage the structure of the wall.
For this project you will need:
- Thorn Finder
- Roulette
- Wireframe square
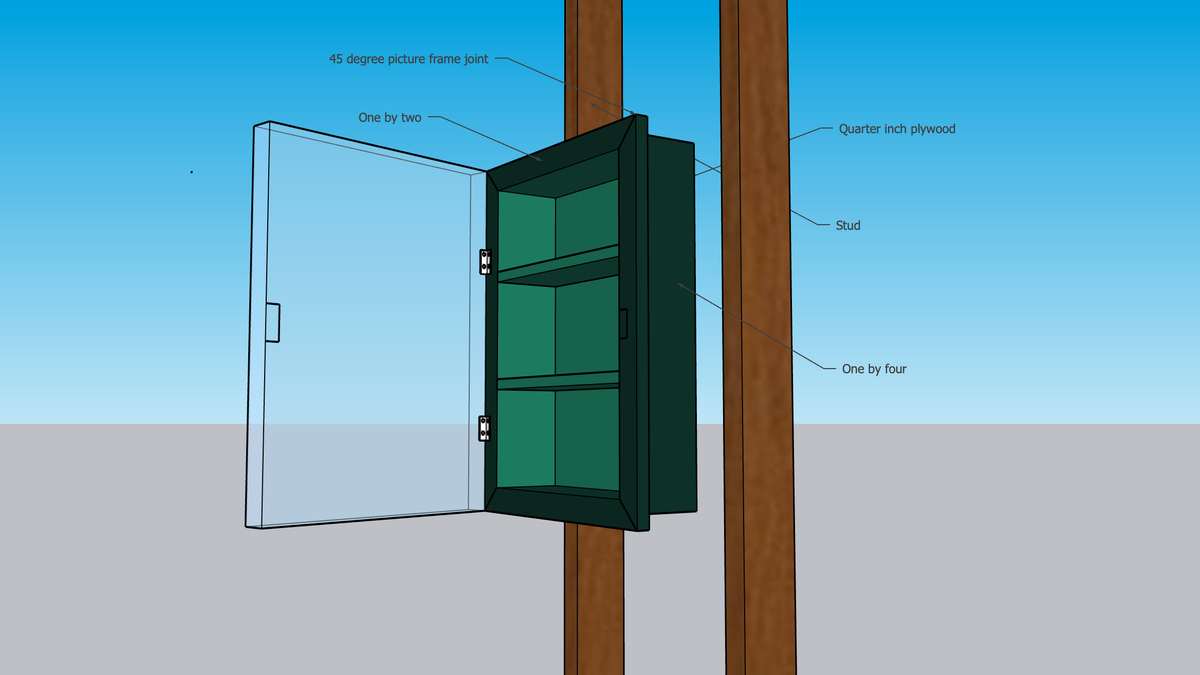
- A sheet of ¼ inch thick plywood (two by four feet is enough) or a similar board large enough to cover the back of your cabinet.
- 12 feet 1 x 4 board
- Eight feet of board measuring one by two inches
- Oscillating saw
- A circular saw
- Miter saw
- Nail gun and pin nails
- Drill with bits
- Two small loops
- Magnetic latch
- A piece of art or a mirror that will serve as a cabinet door (be sure to use a wood frame so you can drill through it to attach the hardware).
How to prepare a wall for a hidden cabinet
To select the correct wall, you will need to use a stud finder to find the space between the studs. A good location won’t be near wiring or plumbing, so keep that in mind. If you’re unsure about the correct wiring, turn off the power and drill a hole large enough to fit a snake camera through, and look around before continuing. Do not cut the wall until you are sure that there is no wiring in it to avoid electric shock.
Once you have found a good spot on the wall between the uprights, mark the shape of your cabinet by marking the top and bottom of the cabinet and determine the width from the distance between the uprights. Once you have marked out the area on the wall surface by drawing the outline of the cabinet, start by first cutting the wall panel inside the space with a vibrating saw using the drywall or plaster cutting attachment. Cut the wall about a quarter or half inch from your marks, and then use the same blade to make the final cut along the marks you made. This will prevent accidental cuts to the studs if your measurements are slightly off. If you need more instructions, here is a helpful video you can watch.
How to make a closet
To make a cabinet box, cut a quarter-inch plywood to the size of the hole you made in the wall with your circular saw. Then cut the top and bottom of the cabinet to fit the width of the opening. Subtract an inch and a half from the overall height of the cabinet and cut out two pieces for the side walls.
Nail the top and bottom boards of the cabinet to the sides. You should end up with a rectangle that fits into the hole you cut out for the cabinet. Next, attach the back of the cabinet to the sides and top. Measure the inside of your closet and cut one or two shelves for the inside from the remaining one-by-four boards.
Attach a secret door and insert the cabinet into the wall.
To make a front edge that you will hang a picture or mirror on, use a one-by-two cut at a 45-degree angle to make the front edge of the cabinet. When you’re done, it should look like a photo frame on the front edge of your closet.
Then, using a drill, attach the hinges to one side of the cabinet and then attach the magnet to the other edge. Attach a picture or mirror to the hinges, holding them straight up and down. Then attach the magnet to the back of the painting. You should be able to open the door and press it against the magnets to keep it closed.
Now push the cabinet into the wall and nail it to the studs to keep it in place. Finally, fill in any nail holes with putty and paint the cabinet to match your walls. This will help to mask out any part of the frame that might be visible and help it blend in with its surroundings.
If you want a visual representation of how all of this can be put together, check out this YouTube tutorial by Ron Hazelton on adding recessed shelves to a wall .