Make an Awesome DIY Water Table for Your Kids This Summer.
In the heat, outdoor activities for children are often limited to swimming. But if you don’t have a pool or splash pad, here’s how to make an awesome water table that pairs with a sprinkler.
Materials you will need to make a water table
- Pieces of wood boards at least 24-36 inches long (about 32 linear feet)
- A piece of plywood measuring 24×36 inches.
- Waterproof caulk and caulk gun
- Waterproof outdoor paint in the color of your choice.
- Brush
- 5 feet or more of 1 ½” or 2” PVC pipe
- 2 90 degree PVC elbows the same size as your PVC pipe.
- 2 PVC splitters
- PVC glue and activator
- Cut-off saw or miter box and hand saw
- PVC brackets the same size as your PVC pipe
- Boer
- Screws ½” and 1 ½”
- ¼” drill and pilot bit
- You will also need a shallow plastic bag if you want to use it as a water container on your desk.
- For the table without a bag, you will need a rubber drain plug and a drill bit of the appropriate diameter.
Assemble the table using a plastic bag
To build a table out of a plastic bag, you will need a storage box that is approximately 16 inches by 24 inches. This build is pretty simple. Cut some boards to make a rectangle that will fit the bag. Remember that measuring your boards will require two sides to be the same length as two sides of the bag, and two sides to be equal to the length of the other two sides of the bag plus the thickness of the two boards. your boards so that the rectangle fits the tub.
Then twist the rectangle together using a drill bit and a drill bit. Once you have the rectangle, add a bottom to it by cutting the boards to fit across the rectangle on one side. This will hold the tub you use for water.
Add table legs
Add legs to the table by screwing 24″ boards onto the sides of the tub holder so the top of the table is 24″ above the ground. (You can adjust the height of the table to suit the height of the children who will be using it). For stronger legs, you can use two 24″ boards joined together at the edge to form an “L” known as a pig trough. Screw these legs into the outer corners of the table to make the legs more stable. Paint the table parts with waterproof outdoor paint before adding the PVC pieces.
Or make a table without a trash can
For a slightly more elaborate water table without a basket, use a 36″ x 24″ piece of plywood to form the bottom of your table. Cut some boards to make a frame that will fit snugly around your rectangle and screw the boards together to make the sides of the table. Then place the bottom of the table on the bottom edge of the rectangle so that you have a 36″ x 24″ bottom and the sides are made from your planks. Drill a hole in the plywood for the drain plug with a hole saw.
You can cut and attach the legs for this type of table in the same way as you would for the plastic tub version, and then use a waterproof caulk to fill in any cracks in the table. Paint the table with waterproof outdoor paint, paying particular attention to the inside of the tub. Once the paint is dry, you can test for leaks by plugging the drain and adding water to the counter, and looking for cracks in the sealant. Then drain the water from the table and patch up any leaks.
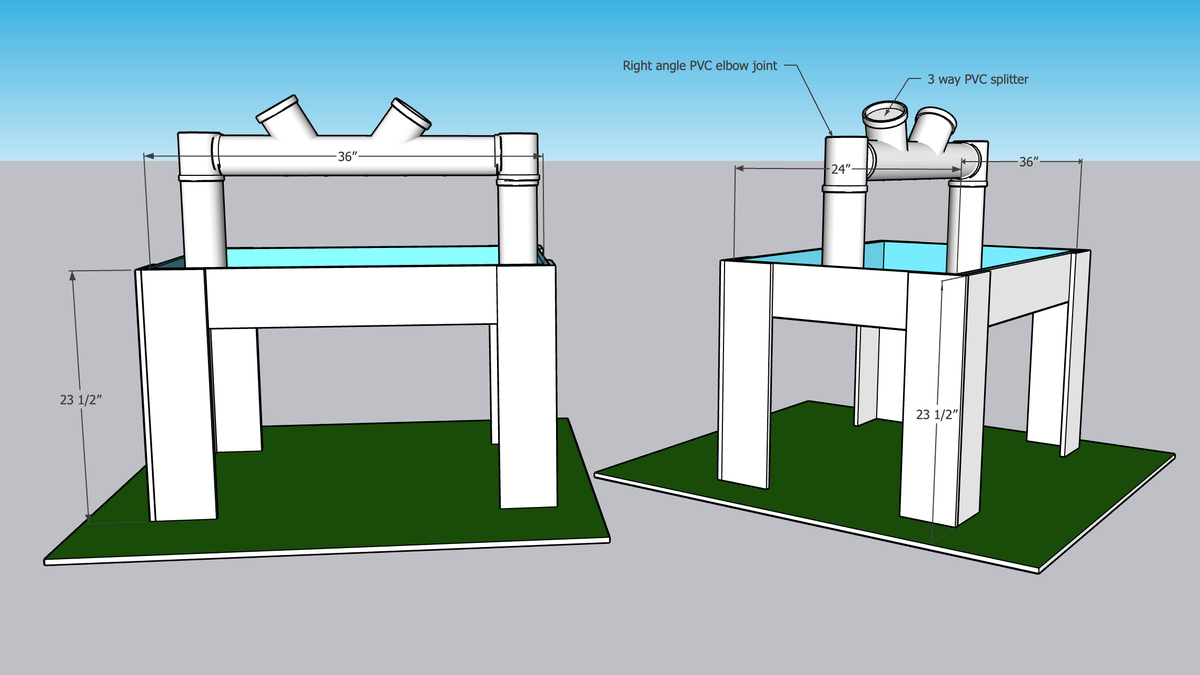
Build your plumbing
The last step for both versions of the table is to cut and install the PVC pipe. First, cut a six inch piece of PVC and glue two triple split fittings to each end. Then cut a piece of PVC pipe for each end of the fitting so that it reaches the inside edge of the table. Add a right angle elbow to each pipe. Attach a 12″ piece of pipe to each bend to form an arch. Then, drill holes along the underside of the pipe that runs along the top of the arch every three to four inches with a ¼-inch bit. Finally, use PVC staples to attach the arch to each end of the table, leaving it about an inch from the bottom of the tub. If you are using a plastic bag as a waterproof countertop container, you will need to attach PVC brackets over the edge of the bag to avoid puncturing it.
Fill your table and have some fun
Finally, fill the table with water and let the children experiment by pouring water into the dividers and watching it drip through the holes. Bath toys, laundry detergent scoops, or plastic containers are all good ways to pour water. Once the kids understand how the arch works, you can add fittings to the dividers to make the table more active, like a valve that directs water to one side or the other of the arch. Of course, make sure children are supervised to avoid accidents.