Six Basic Knife Techniques Everyone Should Know
Like storytelling, culinary skills are often passed down from family. As a child, you go to the kitchen and watch your parents cut, stir, cook and bake several times a day, which is how you do it yourself later in life. While there’s nothing wrong with the knife techniques you grew up with, chances are you’re missing out on a few basic skills. By learning the difference between similar cuts (and when to use them), you can make progress towards cooking goals that have been difficult to achieve, like repeating recipes you’ve seen online. Or maybe you want to work in the food industry – most of the complex professional cuts you see in restaurants start with one of these basic techniques.
A piece
Once you understand the importance of keeping your knives sharp and keeping your fingertips out of the way, you need to learn how to make the first cut. The slice is a single, straight, vertical cut from top to bottom to the cutting board (which is safely and securely placed on the countertop ).
To cut properly, you usually don’t press hard, but instead run the knife smoothly over the ingredient at a constant speed and pressure. This versatile cut can be made wide for a crispy slice of bread, medium for a tomato for a hamburger, or paper-thin for apple chips . Before slicing (or trying any of the following cuts): If your fruit or vegetable doesn’t have a flat side, it’s common practice to cut a small shaving off one side so you can place the product firmly on the cutting board without slicing it. worrying about him rolling away. Then cut as desired.
plank
Cutting leads to sheathing. This cut with a knife involves making a long longitudinal cut. Cutting the board is aesthetic, and I like it no more than grilling. The ideal shape for your vegetables on the boards is thinner rather than longer – rectangular and reminiscent of a wooden board (figure it out for yourself). You can cut into perfect strips of carrots after you cut the rounded pieces evenly. The board can require a fair amount of scrap if you want perfect edges, but you can also make rustic boards. (Who doesn’t love a reclaimed wood coffee table?) For grilling and roasting, cut zucchini, eggplant, cauliflower, and other hearty vegetables lengthwise into thick, even boards.
coarse chop
“Chop” may be a non-specific word for cutting, but by definition it is close to dice (described below). I highlight the coarse chop because, in my experience, it is one of the most commonly used cuts in home cooking. The goal is to get medium and small pieces of approximately the same size, but uniformity is not a prerequisite. This cut does not promise precision or beauty, but it is still safe and useful.
To roughly chop herbs, vegetables, fruits, or nuts, first break large ingredients into smaller pieces. Keep one hand on the handle and the other hand either on the vegetable or on the edge of the knife to put more pressure on your fingers and start slicing. Again, no need to be perfect – just point the blade down at your own pace. After that, grind the ingredients again in the other direction; this could mean turning a knife, food, or cutting board 90 degrees to get the right angle.
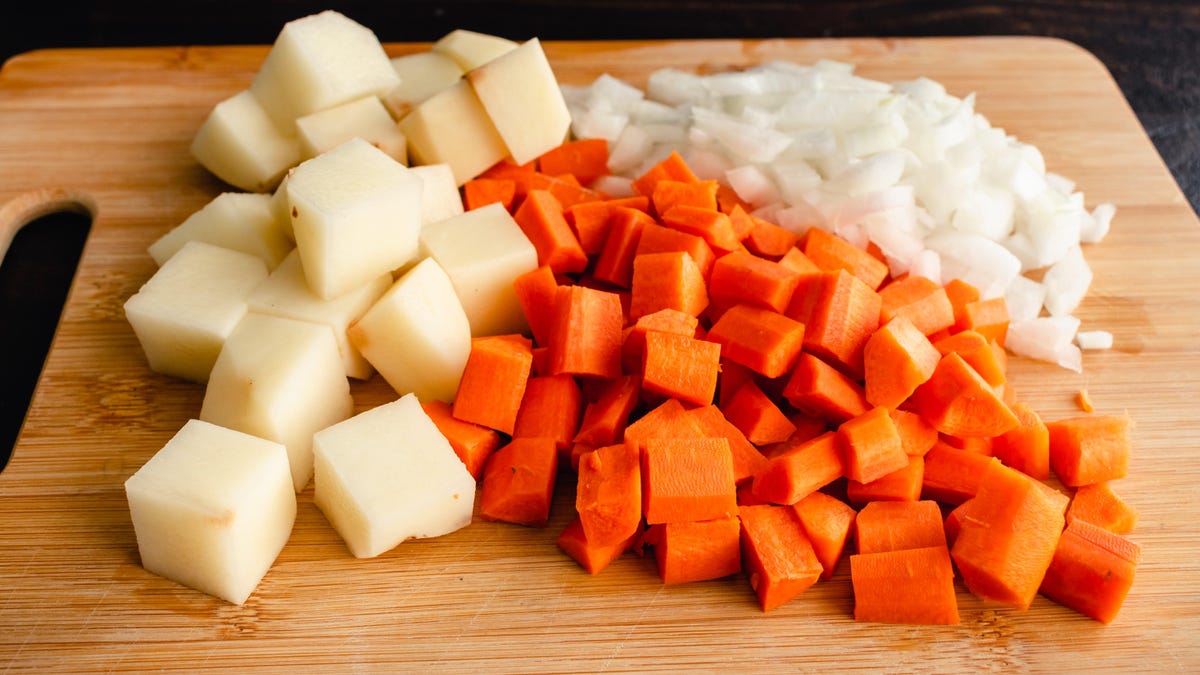
Dice
The bones are more of a precise cut than a rough chop. The goal is to create neat food cubes. You can cut into different sizes of cubes – usually large, medium and small. (Once you’re thinner than a small cube, the cuts will get new names.) To neatly cut fruits and vegetables into cubes, cut off bumps and rounded sides. Cut into boards. Fold the boards and cut them lengthwise once or twice, depending on the size of the cubes. Keep the pieces stacked, rotate the item and cut across the width to get perfect cubes.
Ground meat
Minced meat can be fine or coarse, but the results of both are tiny. Fine grinding is like a very small die; you are making very small cubes. Usually a thin blade is used for this, so you can make cuts close together. Make a series of close parallel cuts of the same size along all three axes, like dice, but with closer cuts. If you had to shred carrots, you would cut them into slices, turn them over and cut them into long strips, then turn the strips over and cut them at a 90° angle and cut straight down to make small cubes. Coarse minced meat is made with a thin blade or even a cleaver, depending on what you are cutting. Often, coarse grinding is done with herbs, garlic, seeds, and nuts—things that are small to begin with—so shaping them into precise cubes is a big task. But it can be fun, as if you’re deliberately overdoing it.
Mice without precision use a sharp chef’s knife with a curved blade to help create wiggle motions. Gather the ingredients together and, using the top of your non-dominant hand, press down on the end of the blade to secure it to the cutting board. Bend your fingers up so they are secure and press down on the knife point so that the heel of the knife is pointing up and the ingredients underneath are waiting to be cut. Your dominant hand holds the handle of the knife. Rock the heel of the knife down the curve of the blade and up again, keeping the tip of the knife in place so that it never loses contact with the cutting board. This creates something like a one-way seesaw. As you move the blade through the ingredients, turn it slightly to change the angle and make smaller and smaller cuts.
Roll cutting
I saved my favorite haircut for last. The cutting of the roll is not entirely accurate, but not “rough” either. Also called a slant cut, it is ideal for long, round vegetables that curl, such as carrots, zucchini, and potatoes. Roll cutting creates a piece of food that has multiple angles, none of which are parallel. Typically, when slicing, slicing, dicing, or minced, at least two edges or cuts are parallel or close to it; not so with the roll. In addition to pleasing aesthetics, cutting vegetables in this way allows you to make pieces of the same size, even if the vegetable has a small and large end. This creates a little more surface area, allowing the vegetables to cook quickly and evenly, and the different angles keep the pieces from bunching up or sticking together in the pan.
To cut carrots, place all carrots on a cutting board facing east to west. If you used to hold the knife at a 90 degree angle to the carrot, from north to south, now you will be turning it at a 45 degree angle inward, from northwest to southeast. Your knife will stay the same by making a 45 degree cut; he is a carrot that rolls. Make the first cut and turn the carrot a quarter or a third of a turn. Cut. Roll the carrot again and repeat. At the thin end, make the cuts further apart, and towards the thick end, make the cuts closer together so that the sections are the same size. Once you get comfortable with this cut, you can adjust the angle of the knife and the distance between each cut to change the shape. Your products will have charming oblique cuts facing in different directions.