How to Grow Ginger at Home
Ginger is one of those ingredients that you don’t have to worry about buying too much when a recipe requires it. With so many uses, including ginger syrup , flavored oil , salad dressing and tea , to name a few, leftovers are always welcome.
But what could be better than ginger? How about having your own supply of ginger that you can grow at home? Yes, we thought so. Here’s what you need to know about growing ginger at home, courtesy of Savannah Cher of BobVila.com .
Climatic requirements
While it is true that ginger is a tropical plant, it can be grown outdoors in most climates. The catch is that it can only survive in temperatures of 50 degrees Fahrenheit or higher. This means that in parts of the country – such as parts of Florida, California, and Arizona – ginger can be harvested all year round.
But the rest of the US hasn’t been left out: According to Scher , ginger can be grown in cooler climates – it’s just that the season is shorter. In these areas, she says, ginger is best planted after (what appears to be) the last spring frost.
Although it takes about eight months for ginger to reach its full potential, in cooler parts of the country, you can harvest young ginger in three or four months. Or, if you want to keep the party going, just bring some pots for the winter.
Stocks
Unless you live in an area where temperatures rarely drop below 50 degrees, you need to plant ginger in pots so you can bring them indoors when temperatures drop. Here’s a complete list of what you’ll need:
- Pot 12 ” deep
- The soil
- Mulch
- Soil thermometer
- Organic Ginger Root (Inorganic ginger is often treated with a growth inhibitor, so not ideal for this)
Prepare your ginger for planting
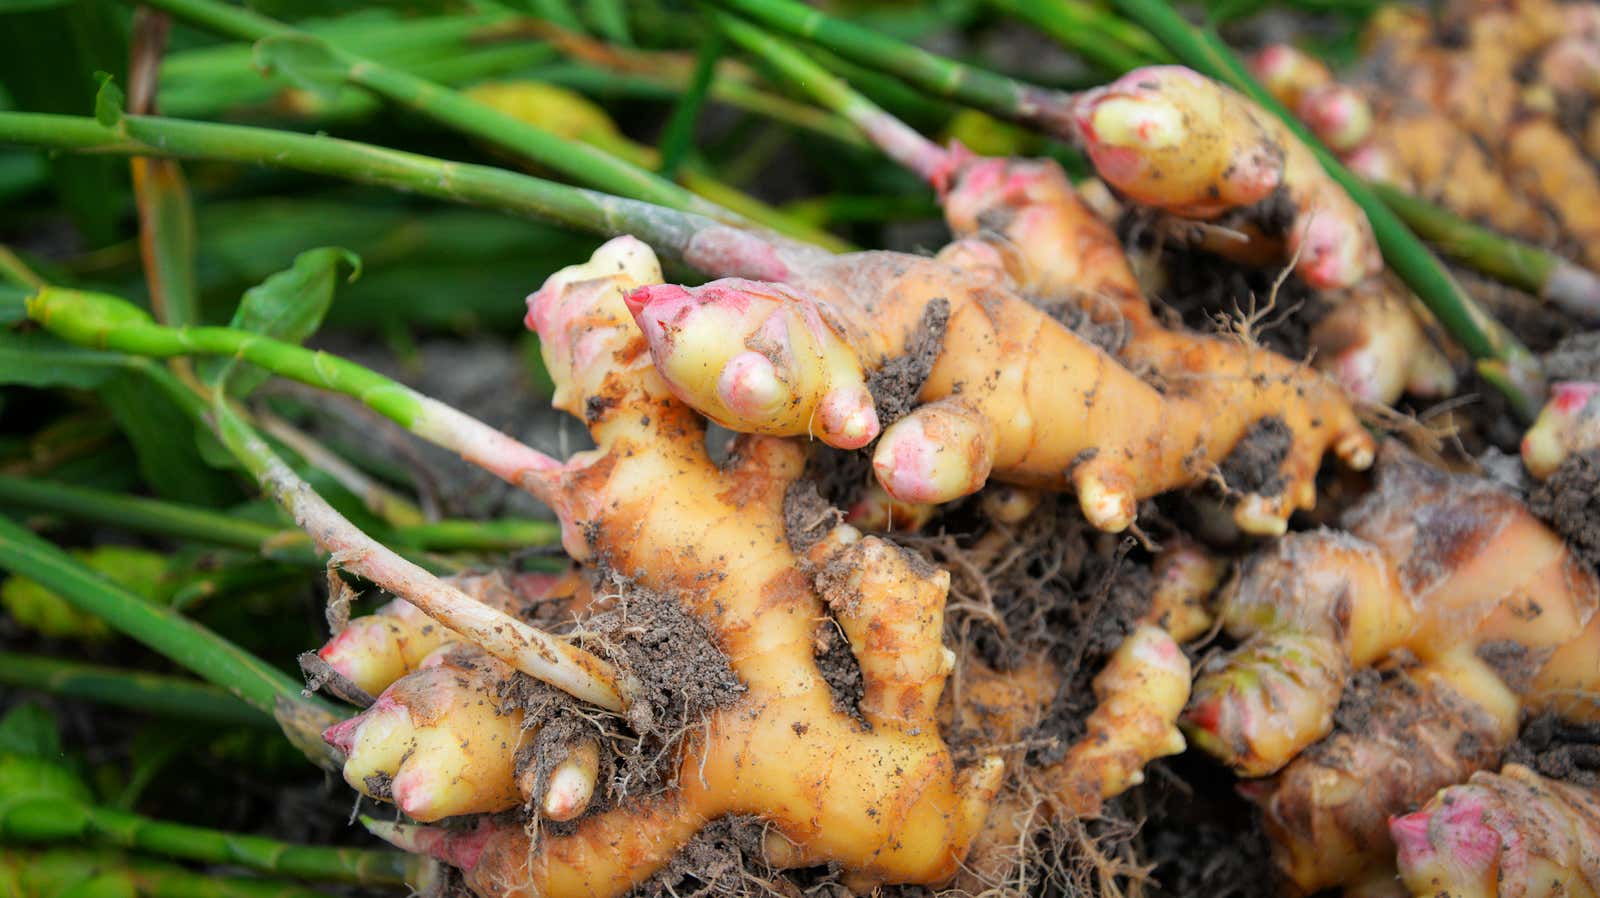
You can harvest organic ginger rhizomes (another word for the stem that grows underground – in this case, the way you usually buy ginger) from a grocery store or nursery. Here are some of Cher ‘s tips for choosing:
Look for rhizomes with smooth and light skin. Ideally, take a 4 to 6 inch piece of ginger with multiple toes and a bud at the end of each toe. If the buds are starting to turn green, you will be one step ahead in the growth process.
Then, carefully cut your fingers off each rhizome so that each piece is at least 1–2 inches long and has a bud at the end. Once this is done, place them in a cool dry place and leave there for 24 hours. up to 48 hours. “This allows them to form protective skin on newly cut areas that prevents them from becoming infected with bacteria,” Cher writes .
Planting ginger
First, find a place for the ginger to grow. If you live somewhere with warm temperatures year-round, choose a location in the shade. Anywhere else, you’ll want to find a place that gets two to five hours of sunshine every day. Here’s Cher again to walk us through the landing process:
Plant the ginger slices in a pot or directly on your garden bed. The ideal soil is loose and loamy (fertile). Ginger needs a lot of room to grow, so plant each bite 12 inches apart, 2 to 4 inches deep, with the buds facing up. If you are using a pot, choose one that is at least 12 inches deep and provides good drainage. You can grow one piece of ginger in a pot this size.
Ginger thrives in moist, warm soil with temperatures ranging from 71 to 77 degrees. Water the soil immediately after planting. Continue to keep the soil moist by watering it daily until it is dry. This reproduces its natural tropical habitat. Depending on the climate, seedlings will appear from 3 to 14 days.
Spread a layer of mulch over the top of the soil to keep it warm if the temperature drops below 50 degrees. It also helps to keep the soil moist. As the weather becomes cooler towards the end of the growing season, reduce watering.
Ginger picking
You can dig up the entire plant to harvest it, but if you want to keep growing the ginger afterwards, there is an easier way. Cut off only the parts of the plant that you want to harvest, leaving them in the soil. “As long as a 2-inch piece of rhizome is attached to the stem, it will continue to grow,” explains Cher .