How to Share Your Location on WhatsApp and Other Apps
The thought of giving your phone permission to track your location is a bit frustrating, but there are many scenarios where you might want a friend or family member to know exactly where you are at any given time.
You might like to share your location when you are on a run or on the road so people know when you’ll arrive or if you’ve made it safely to your destination. Or, you might be using location sharing to keep track of a group of friends at night.
There are quite a few apps out there that allow you to share location, and both iOS and Android have location sharing features built in.
For these features to work in any app, you need to enable location sharing for each individual app in your device’s settings. On iOS, go to Settings , scroll down and select the app you want to use. Tap Location and choose if you want the app to always access your location only when it’s in use, or never.
On Android, go to Settings> Location> App Permission . You will see a list of apps that are allowed to use your location all the time or only during use. Tap an app name to change or remove its permissions.
How to enable location sharing in popular Android and iOS apps
There are many apps that allow you to share your location in different ways. Here are a few of our favorites (and how to set up location sharing in each).
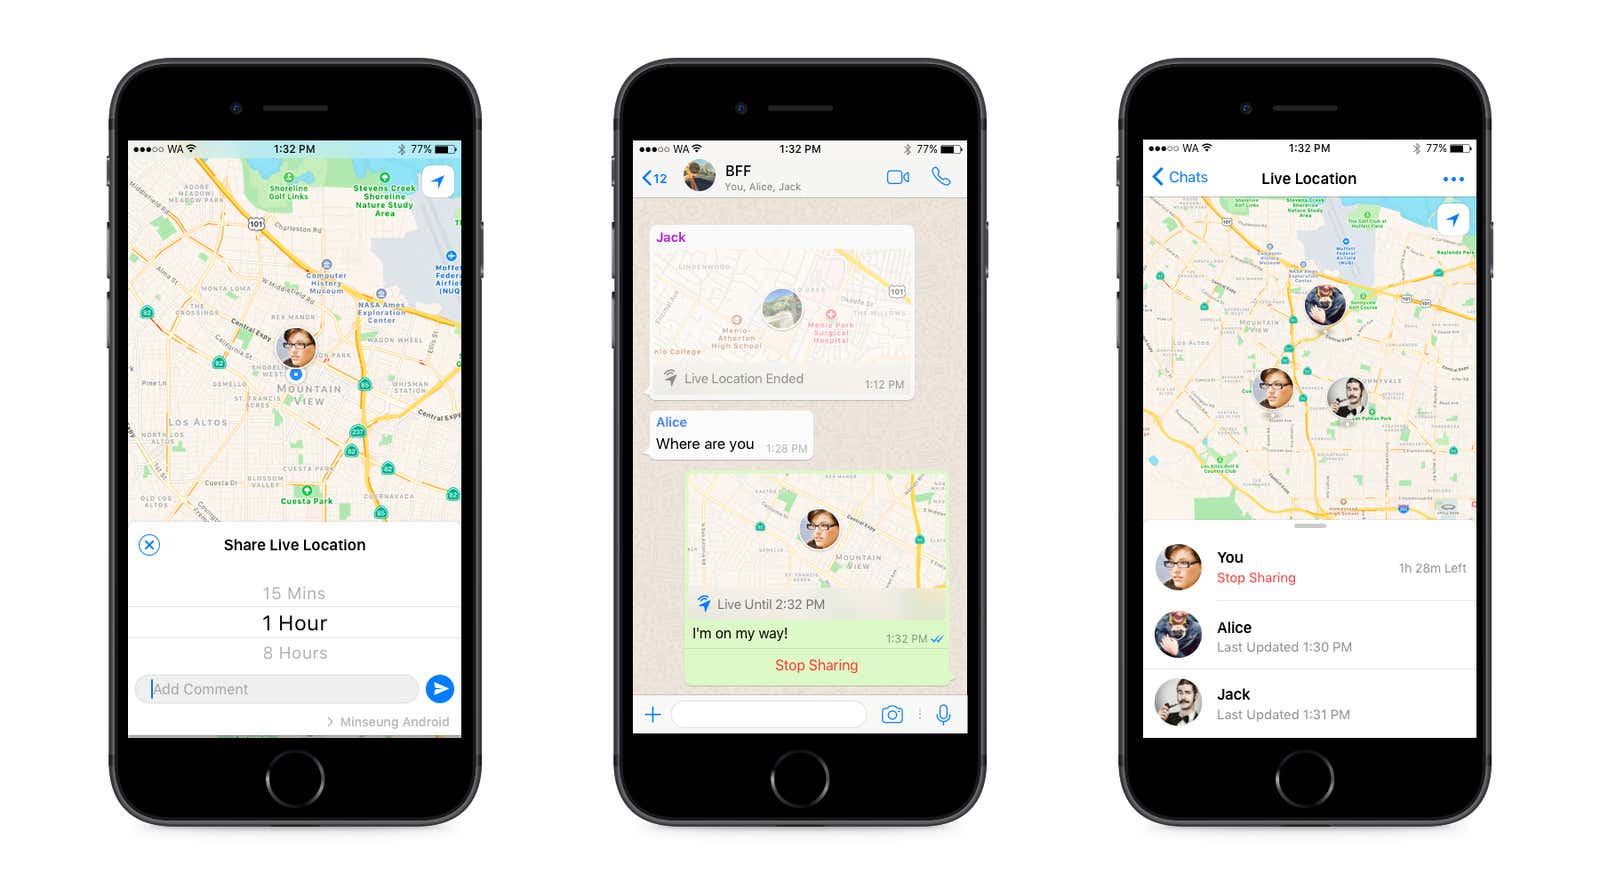
Live Location Sharing on WhatsApp
To share your location with a friend or group on WhatsApp, open a conversation from your chat list and click on the plus sign in the lower left corner.
Select Location, and then tap Share Current Location. You can decide how long you want to share (15 minutes, 1 hour, or 8 hours) and add a comment before submitting if you want.
To stop sharing, open your group or one-to-one chat again and tap Stop Sharing> STOP .
Just like messaging and calling WhatsApp, location sharing is end-to-end encrypted . You can also turn off location sharing at any time by simply turning off WhatsApp permissions on your device.
Sharing location information on Facebook Messenger
To share your location on Facebook Messenger, open a conversation, click the plus sign, and then select the Location icon (arrow on the right). A map will appear – tap Start Show Current Location to share your location with a friend or group within 60 minutes.
You can also stop sharing early by clicking Stop Sharing at any time.
Live location sharing on Google Maps
To share your location on Google Maps, open the app and tap the blue dot representing your location. Tap Share your location, and then choose how you want to share your location and for how long.
Google Maps seems to offer the most control over how long you want to share your location, with the option to choose from 15-minute increments up to an hour, followed by hourly intervals beyond that. You can also keep sharing your location until you manually turn it off – the choice is yours!
You are not limited to sharing your location in one app. You can click Select People to share it with someone from your Google contacts or device via Google Maps or email. You can also choose another messaging app to send the link to your location (tap the app icon or More for more options).
Real-time data exchange in Glympse
None of us need another app, but if you are using location sharing mainly for trips or travel, Glympse allows you to share (or query!) Your current location along with your destination and route.
To create a Glympse, tap the Glympse icon at the bottom center of the Home Screen and then tap Request. Enter the following:
- Recipient’s contact information (number or email address)
- Your message (individual or selected from presets)
- What is your destination
- How long do you want to report your whereabouts (and what mode of transport do you use)
- Should Glympse stop sharing information when you arrive
When you send Glympse, the recipient can see your location, your speed, and your route progress. This is handy if you want a friend or family member to know your exact ETA – and they don’t need to install Glympse themselves to get this information.
Location Sharing on Snap Map Snapchat
Snapchat has a semi-live location sharing feature called Snap Map that shows you where your friends are using your Bitmoji (or a blank outline if you or don’t have one). To launch the Snap Map, simply open Snapchat and drag down.
You will be prompted to choose who you want to share your location with: with your entire list of friends, with all friends who are not on the blocked list, or with specific friends that you choose. You can also switch to ghost mode to stay hidden. Your location will expire in a few hours.
Snap Map doesn’t run in the background, so your friends can only see your location if you’re actively using the app. In some ways, this is the least invasive option, but if you want someone to always know where you are, this is not the best option.
How to directly share your location on iOS
If you don’t want to use any of the above apps, iOS also has a built-in location sharing feature. (On Android, just use Google Maps, which comes with most Android devices.)
On iOS, the easiest way to share your location is through Messages. Open the Messages app, select a conversation with a recipient, tap their name or icon at the top of the conversation, and tap the info icon. Select Share My Current Location to share the dropped pin, or select Share My Location to share for an hour, a day, or indefinitely.
You can also use Apple’s Find Me app (or Find My Friends on older devices) to connect with other people wherever you are. Contact someone in the app through the People tab and you both can see each other’s location whenever you want. I would leave this for your next of kin and loved ones, perhaps not for your roommates or casual acquaintances.
This article was originally published in 2017 by Jacob Kleinman and updated on May 1, 2020 by Emily Long. Our updates include the following: fixed steps for each app to ensure accuracy, added information about Glympse and native location sharing for iOS and Android, added new screenshots, and revised the first paragraph.